
There are a few ways that the EndNote Desktop software differs for Mac users. This doesn't impact any features or accessibility, but it can be confusing to use EndNote if you aren't aware of these differences!
Creating a Library & Adding References
Creating a Library
EndNote X9 gives you the option to create a "Package" file that contains both the .enl file and the .data folder. This ensures you don't accidentally delete important data. However, if you are using Covidence for a systematic review and using the bulk upload feature, you'll need to access individual PDF files. To do this, save a copy of your library and do not select the Package file option.
Importing References
Similar to using EndNote on a PC, you can click on the downloaded citation file and it should automatically open in EndNote. You can also import citations by clicking File -> Import.

Select the file you want to import and then click Options at the bottom left of the window. If you are importing a file from PubMed, you'll select PubMed (NLM) as your Import Option. You may need to click on Other Filters in the dropdown menu if you do not see this option. If you are downloading from another database, you'll likely select Reference Manager (RIS). Then select Import.

Browser Selection
To enable Direct Export (automatic downloads) from electronic databases to your EndNote library, you must use Mozilla Firefox. Use of other browsers (Safari, Google Chrome) to add references to your EndNote library is possible, but requires an extra step.
For complete instructions on adding references to your EndNote library, see Adding References to EndNote.
The Toolbar
The Toolbar Looks Different
EndNote for Mac has fewer icons at the top for quick changes. More functions are located in the Edit, References, and Groups menus at the top of the screen. Refer to the following picture and description for what each icon does:

- Sync Library: Sync your desktop and EndNote Online libraries.
- Share Library: Invite other users to access your EndNote synced library. Refer to the section on EndNote Online for more information.
- Activity Feed: Records of recent transactions in your shared library.
- Find Full Text: Select article(s), and then click this button to find full text for citations. You can also click References > Find Full-text.
- Find Reference Updates: This will search the web for any updates to the citations in your library.
- New Reference: Add a new citation manually. You can also click References > New Reference.
- Local Library Mode: Display only your local library and does not display Online Search results.
- Online Search Mode: Display only online search results. Records retrieved are not automatically included in your local library.
- Integrated Library and Search Mode: Display both local library and online search results.
- Copy to Local Library: When in Online Search Mode, copy records into your local library.
- Layout: Change the layout of your EndNote Desktop window.
Styles Menu
The output styles menu is located under Edit > Output Styles. You can also find the output styles in the reference panel (circled in red).
Select the style you want from the drop-down menu or click Open Style Manager for more styles.
For more information on Output Styles, see the Output Styles page in this guide.

Find Full Text and Other Settings
The Find Full Text feature is available for EndNote on macOS, but setting up the OpenURL Path (and settings for other preferences) is slightly different on a Mac.
Find Full Text
The Find Full Text feature is most effective when you are connected to the UNC-CH campus network (eduroam). If you are using the feature off campus, you'll want to add an OpenURL Path so that you can access articles in UNC subscriptions.
1. In your EndNote Library, select EndNote X9 > Preferences from the menu bar. The EndNote Preferences dialog box will open.
2. In the left column, click on Find Full Text
3. Ensure that all four boxes are selected (Web of Science, DOI, PubMed, and OpenURL
4. Copy and paste the following text into the field called OpenURL Path:
http://vb3k7eb4t.search.serialssolutions.com/
5. Verify that the information in the dialog box matches the box picture below.
6. Click Save and exit out of the dialog box.

Adding References
Browser Selection: To enable Direct Export (automatic downloads) from electronic databases to your EndNote library, you must use Mozilla Firefox. Use of other browsers (Safari, Google Chrome) to add references to your EndNote library is possible, but requires an extra step.
For complete instructions on adding references to your EndNote library, see Adding References to EndNote.
Cite While You Write and Office 2016 for Mac
Note: Office 2016 for Mac and the EndNote Cite While You Write plugin for Word do not play nicely together. This may result in you not seeing the CWYW tab in your Word 2016 interface. The crux of the problem appears to be that only EndNote X7.5 is compatible with Office 2016 for Mac.
Cite While You Write
How do I get Cite While You Write (CWYW)?
- You need to have Microsoft Word installed on your computer before you install EndNote.
- EndNote X7 and X6 are compatible with Microsoft Word 2008 and 2011.
- Installing X7 will add the EndNote submenu automatically. If you are installing X6, you will have to install it manually.
- EndNote X8, X9, and EndNote Online are compatible with Microsoft World 2016, 2019, and 365.
Where is the Cite While You Write in Word?
CWYW is under the Tools menu in Word.
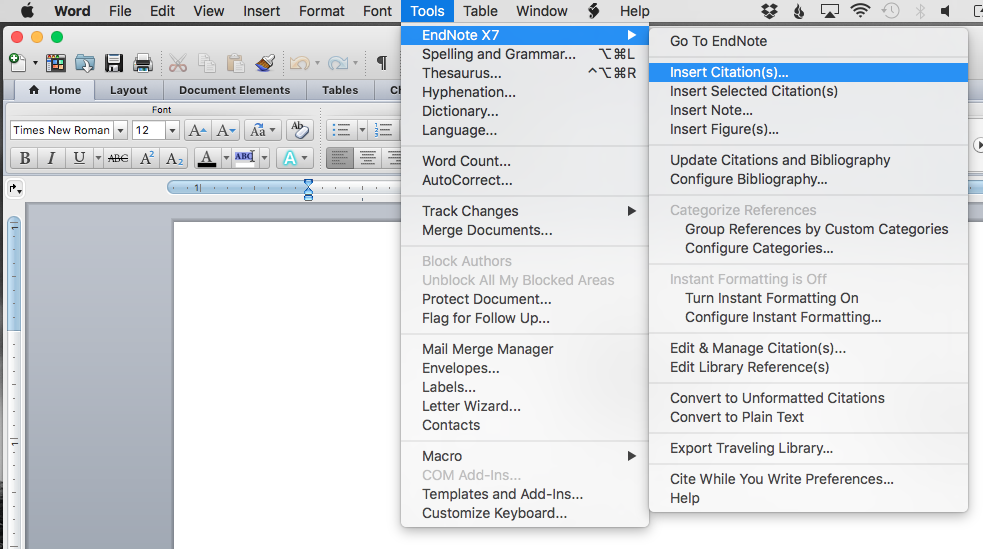
How do I insert a citation?
- Make sure both your EndNote library and your Word document are open. Position the cursor in Word where you want to insert a citation.
- Select Insert Citation under the Tools > EndNote (see above picture).
- The EndNote Find & Insert My References box will appear. Enter text (author's last name, year, title, keyword) to search for a particular reference or insert an astrick (*) to search through all references in your library. Click the Find button.
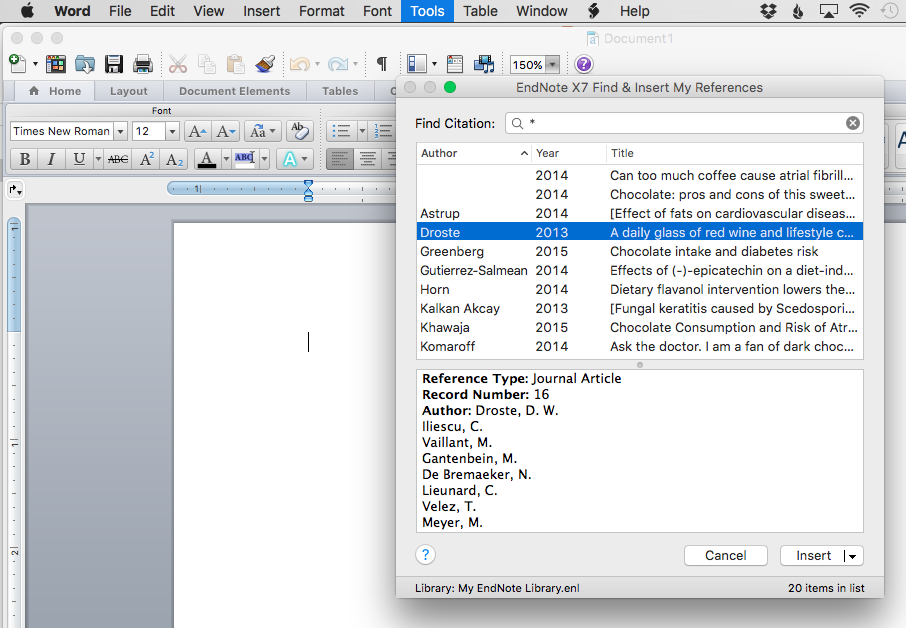
- In the results of your search, click on the reference that you want to cite to highlight it. To highlight multiple references, hold down the Ctrl key while you click on references.
- Once you have selected your references, click on the Insert button. The selected references will be inserted into your Word document and displayed as defined by the current Output Style.
How do I change the output style in my Word document?
- In the Word toolbar, select Tools > EndNote > Configure Bibliography.

- Choose your desired style from the With output style drop-down menu. If a style does not appear in the drop-down menu, click on the Browse button to find another style. Click OK.
